Set up a smart home voice assistant to control compatible lights, plugs, thermostats, or other devices with spoken commands. This guide is for beginners who have a voice assistant and at least one smart home device, and want to connect them, test basic control, and create a simple routine. Allow 30-60 minutes, depending on how many devices you add and whether any need firmware updates.

Get everyday essentials delivered free with Prime
- Fast, free delivery on millions of items
- Prime Video, Amazon Music and more included
- Member-only deals all year

Echo Dot Max with Amazon Smart Plug Bundle
- ✔ Dimensions: 4.27 x 4.27 x 3.9 in
- ✔ Weight: 17.82 oz
- ✔ Audio: 0.8 in tweeter, 2.5 in woofer; 53 Hz–16 kHz
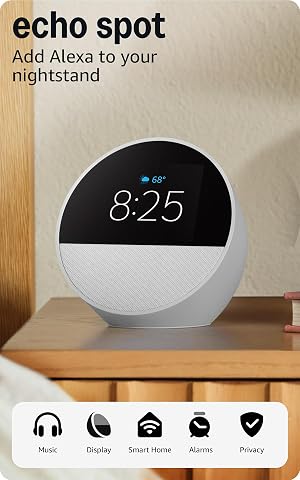
Echo Spot Smart Alarm Clock – Glacier White
- ✔ Dimensions: 4.5 x 4.1 x 4.4 in
- ✔ Weight: 14.3 oz
- ✔ Display: 2.83 in, 240 x 320 touch screen
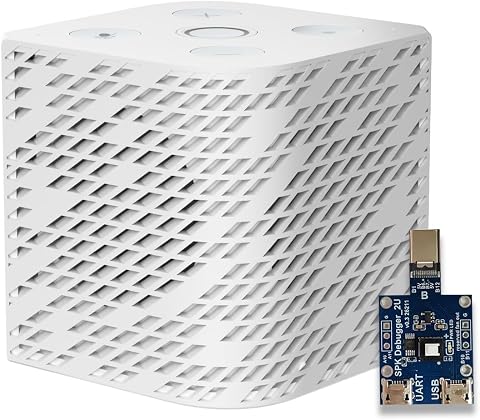
Third Reality Voice/Music Assistant Dev Edition
- ✔ Processor: Quad-core ARM A53
- ✔ Memory: 256 MB RAM
- ✔ Storage: 512 MB flash
Difficulty: Beginner | Time: 30-60 minutes
What You’ll Need
Tools & Materials:
- A voice assistant device or its mobile app
- A smartphone or tablet with the assistant app installed
- A stable Wi-Fi network and its password
- At least one smart home device that works with your assistant
- Device power adapters or batteries, if required
Knowledge:
- Basic use of a smartphone app
- How to connect a phone to your home Wi-Fi
- The name and location of the smart device you want to add
Check the packaging or the manufacturer’s app listing to confirm that your smart device works with your assistant. Some devices require a hub, a specific Wi-Fi band, or a separate account. Keep the device’s setup guide nearby. Do not share your Wi-Fi password or account credentials with anyone helping you troubleshoot.
Echo Dot Max with Amazon Smart Plug Bundle
For an Alexa household building beyond a few voice-controlled lights, the Echo Dot Max bundle offers the most complete control setup in this group. Its built-in hub supports Zigbee, Matter, and Thread, so compatible devices can connect through the speaker rather than requiring a separate hub for each standard. The included Smart Plug gives the bundle an immediate use for a lamp or appliance, while the Spot focuses more on bedside convenience and the Third Reality on Home Assistant.The Max also has the strongest automation story here: Omnisense sensors detect ambient temperature, light, presence, and movement, which can inform routines without waiting for a spoken command. Room-filling audio and a woofer give it more musical presence than the Spot’s compact bedside speaker. There are limits, though. Its eero extension depends on compatible eero equipment, and Bluetooth hands-free control is not supported for macOS; some PIN-dependent speakers also will not pair. Buyers committed to Home Assistant should consider Third Reality instead, since this bundle is built around Alexa.
Pros:
- Built-in Zigbee, Matter, and Thread hub supports a wide mix of compatible devices.
- Omnisense sensors can support presence-, light-, and temperature-aware routines.
- Includes an Amazon Smart Plug for immediate voice control of a lamp or appliance.
- Larger woofer and room-filling audio suit music as well as spoken commands.
Cons:
- The eero extension requires a compatible eero router and account setup.
- Bluetooth hands-free control is unavailable for macOS, and some speakers requiring PIN codes are incompatible.
Best for: Alexa users who want one speaker to connect compatible smart home devices, trigger sensor-based routines, and control an included plug.
Not ideal for: Home Assistant-first households, macOS users seeking Bluetooth hands-free control, or anyone without compatible eero equipment who expects Wi-Fi extension.
Bottom line: For Alexa homes that want voice control, sensor-led routines, and broad device compatibility in one setup, the Dot Max bundle is the strongest all-around choice.
“For Alexa homes that want voice control, sensor-led routines, and broad device compatibility in one setup, the Dot Max bundle is the strongest all-around choice.”
Echo Spot Smart Alarm Clock – Glacier White
The Echo Spot is a better fit for a nightstand than for serving as the center of a growing smart home. Alexa handles voice commands, music, routines, and compatible devices, while its 2.83-inch touch display makes time, weather, and song information visible at a glance. Compared with the Dot Max, it trades a built-in multi-protocol hub and environmental sensing for a screen designed around everyday bedside use.Its compact footprint and full-range speaker make it a practical choice when you want an alarm clock that can also respond to voice requests. It can extend Wi-Fi through eero Built-in, but that feature is conditional on owning a compatible eero router, and its extension speeds and device support are limited. The camera-free design means it cannot handle video calls; buyers who want richer smart home integrations should look to the Dot Max, while Home Assistant users will find Third Reality’s open platform a closer match. Bluetooth support has caveats, too: hands-free use with macOS is unavailable and some PIN-code speakers are not supported.
Pros:
- Small touch display shows time, weather, song titles, and clock faces.
- Alexa voice control supports compatible smart home devices, music, and routines.
- Compact shape and full-range speaker suit a bedside table.
- Can extend coverage when paired with a compatible eero router.
Cons:
- No camera, so video calling is unavailable.
- eero extension requires a compatible router and has limited speed and device capacity.
- Bluetooth hands-free control does not support macOS, and some PIN-code speakers will not pair.
Best for: Alexa users who want a compact bedside clock with a glanceable display, voice routines, and music playback.
Not ideal for: Buyers who need a built-in smart home hub, video calling, or Wi-Fi extension without compatible eero equipment.
Bottom line: The Spot is the clearest choice for a bedside Alexa setup where a small screen matters more than advanced device integration.
“The Spot is the clearest choice for a bedside Alexa setup where a small screen matters more than advanced device integration.”
Third Reality Voice/Music Assistant Dev Edition
Where the Echo models center on Alexa, the Third Reality Voice/Music Assistant Dev Edition is explicitly aimed at a Home Assistant setup. It arrives with Home Assistant Voice Assistant and Music Assistant, giving users a compact endpoint for spoken control, text-to-speech, and music playback. Its open Linux platform supports firmware flashing, live logs, and on-device editing, making it the most customizable option here. That openness is useful for people who want to understand and adjust their system; it also means this is not the simplest plug-in-and-forget pick.Compared with the Dot Max, Third Reality lacks the listed Zigbee, Matter, and Thread hub, eero extension, and sensor suite. Instead, its appeal is alignment with Home Assistant and a small cube form factor. Dual digital microphones support voice capture, and the 3 W speaker handles local audio, but neither the listed memory nor storage suggests a device for demanding add-ons. 2.4 GHz-only Wi-Fi and no Bluetooth further limit placement and connections. Choose it when Home Assistant integration and tinkering are priorities; choose the Spot for a display and Alexa convenience, or the Dot Max for broader built-in device connectivity.
Pros:
- Preloaded with Home Assistant Voice Assistant and Music Assistant.
- Dual digital microphones support wake-word detection and voice capture.
- Integrated 3 W speaker handles voice responses and music without external speakers.
- Linux platform supports firmware flashing, logs, and on-device editing.
Cons:
- Wi-Fi is limited to 2.4 GHz, with no Bluetooth or additional listed connectivity.
- 256 MB RAM and 512 MB storage constrain more demanding applications.
- It lacks the Echo models’ display, Alexa routines, and built-in smart home hub features.
Best for: Home Assistant users who want a compact voice and music endpoint they can inspect, flash, and customize.
Not ideal for: Buyers seeking a polished Alexa appliance, multi-protocol smart home hub, Bluetooth connectivity, or support for resource-heavy applications.
Bottom line: For a Home Assistant user who values an open, compact voice endpoint over broad connectivity or turnkey Alexa features, this is the focused pick.
“For a Home Assistant user who values an open, compact voice endpoint over broad connectivity or turnkey Alexa features, this is the focused pick.”
As an Amazon Associate we earn from qualifying purchases.
Before You Start
Place the assistant within Wi-Fi range and near a power outlet. Keep the smart device close to the router during setup if its instructions recommend that. Use the same home network for your phone, assistant, and smart devices unless the manufacturer specifies another arrangement. If the device controls a lock, heater, oven, or another safety-sensitive system, read its safety instructions before enabling voice control. Do not rely on voice commands as the only way to control equipment that must work during a network or power outage.
Step-by-Step Instructions
Step 1: Install and sign in to the assistant app
Download the official app for your voice assistant from your phone’s app store. Check the publisher name before installing. Open the app, sign in to the account you plan to use for your home, and allow only the permissions needed for setup. If the app asks to use Bluetooth or your local network to find nearby devices, allow access while pairing.
Tip:Use an account you can access later to manage the home. Avoid creating multiple home profiles unless separate household spaces are needed.
Check: The app opens to a home screen or device list, and it shows the account you intended to use.
Step 2: Power on and connect the assistant
Plug in the assistant or charge it as directed by its maker. In the app, choose the option to add or set up a device, then select the assistant model. Follow the prompts to connect it to your home Wi-Fi. If the app asks you to confirm a code, sound, or light pattern on the assistant, compare it with the screen before continuing.
Tip:If your router has separate network names for 2.4 GHz and 5 GHz Wi-Fi, follow the assistant’s instructions about which one to use. Some smart home devices only connect to 2.4 GHz.
Check: The assistant appears in the app as online or ready, and it responds to a test command or setup sound.
Step 3: Prepare the smart device
Install the device according to its own guide. For a bulb, switch off the light before fitting it. For a plug, connect it to an outlet and then attach only equipment the plug is rated to handle. Turn the device on and put it in pairing mode using the maker’s steps. Look for the stated light pattern or other pairing signal.
Tip:Do not guess how to reset or pair a device. A long button press can erase settings, so use the exact procedure in its guide.
Check: The device is powered and shows the pairing signal described by its manufacturer.
Step 4: Add the device to its manufacturer’s app
Open the device maker’s app and select its add-device option. Choose the device type, connect it to Wi-Fi if prompted, and give it a clear name such as “Desk lamp” or “Hallway plug.” Use names that are easy to say and distinct from other device names. Complete any required account linking or firmware update, and leave the device powered on during updates.
Tip:Names such as “Lamp 1” and “Lamp 2” can be hard to distinguish by voice. Include the room or function in each name.
Check: The device appears in the maker’s app and responds to an on/off control there.
Step 5: Link the device service to your assistant
Return to the assistant app and open its smart home, works-with, or connected services section. Search for the device maker’s service, select it, and sign in to the maker account when asked. Review the requested access, then approve the link if it covers the devices you want to control. Run the app’s device discovery if it does not add the device automatically.
Tip:Use the same maker account that contains the device. Linking a different account can succeed while showing an empty device list.
Check: The assistant app lists the smart device with its current name and room, if assigned.
Step 6: Assign a room and test a spoken command
In the assistant app, assign the device to the room where it is installed. Then say a short command using the assistant’s wake phrase and device name, such as “Turn on the desk lamp.” Test the opposite command as well. Check the physical device while you test, and use the app control if speech recognition is unclear.
Tip:Pause briefly after the wake phrase. Speak the exact device name you assigned, especially if the assistant recognizes several similar names.
Check: The device changes state when commanded, and the assistant identifies or controls the intended device rather than another one.
Step 7: Create a simple routine
Open the assistant app’s routines or automations section and choose to create one. Give it a descriptive name, such as “Good night.” Select a trigger, such as a spoken phrase, then add one low-risk action, such as turning off a lamp. Save the routine and try the trigger once while you can observe the result. Add more actions only after the first one works.
Tip:Start with a command that is easy to test and reverse. Avoid routines that unlock doors or operate appliances without a clear safety plan.
Check: The routine appears in the app and runs the selected action when you use its trigger.
Step 8: Review privacy and household access
Open the assistant’s privacy and security settings. Review microphone controls, voice recording history, purchase protections, and options for deleting recordings. Set a purchase PIN or disable voice purchasing if you do not want purchases by voice. Add household members through the app’s official sharing feature and give each person only the access they need.
Tip:Muting the microphone may disable voice commands until you unmute it. Check the indicator or app status so you know when listening is off.
Check: You can find the microphone and recording controls, and the household access shown in the app matches who should use the system.
Common Mistakes to Avoid
- Trying to pair a device before it is in pairing mode. — Use the device guide to start pairing mode and confirm its signal before searching in the app.
- Connecting devices to different Wi-Fi networks or accounts. — Check the network name and account in each app, and use the same household network and intended maker account where required.
- Giving several devices similar names. — Use short names that include the room or purpose, then test each name aloud.
- Adding a routine with actions that have not been tested individually. — Test each device from the app first, then build and run the routine while you can see what it does.
Troubleshooting
Problem: The assistant app cannot find the smart device.
Solution: Confirm that the device is powered and in pairing mode. Move it closer to the router, check whether it requires 2.4 GHz Wi-Fi or a hub, and retry from the maker’s app. Restart the device and router only if the device instructions recommend it.
Problem: The device works in its own app but not by voice.
Solution: Check that the maker service is linked to the correct account in the assistant app. Run device discovery, confirm the device name, and ask the assistant to sync or refresh devices if that option is available.
Problem: The assistant controls the wrong device.
Solution: Rename devices with distinct room and function words, update any room assignments, and repeat the command using the full device name.
Problem: A command fails intermittently.
Solution: Check the Wi-Fi signal where the device is installed and confirm that both apps show the device online. Install pending app or device updates, then test the device from its own app and by voice to identify which connection is failing.
What Success Looks Like
Your assistant shows as online, the smart device appears in both the maker’s app and assistant app, and spoken on/off commands control the correct device. The sample routine runs its action when triggered. You can locate the microphone and recording settings, and the device remains controllable from its app when voice control is not available.
Next Steps
Add other compatible devices one at a time, using clear names and room assignments. Test each one before including it in a routine. Review shared access when household members change, and revisit privacy settings after app updates. Keep the device guides and account recovery details in a safe place. If a device controls a safety-sensitive system or continues to disconnect after network checks, consult its manufacturer’s support instructions.
Frequently Asked Questions
Do all smart home devices work with every voice assistant?
No. Check the device packaging or manufacturer listing for explicit support for your assistant and model. Some devices require a hub, a certain Wi-Fi band, or a linked maker account.
Can I use a voice assistant without a smart speaker?
Often, yes. Many assistant apps accept spoken commands through a phone, though availability depends on the app, phone settings, and region. Check the app’s voice controls and microphone permissions.
Will voice control work if the internet is down?
It depends on the assistant and device. Cloud-based commands may stop working, while some devices still respond through a local app, physical switch, or hub. Keep a manual control method available.
How can I stop the assistant from listening?
Use the assistant’s microphone mute control or its app setting. Check the device indicator or app status to confirm that the microphone is muted, and review recording deletion options in privacy settings.