TL;DR
Moving your noisy rig into another room is the most effective way to quiet it down. When that’s not an option, proper placement, sealing gaps, and layered acoustic treatments can make a tiny closet into a surprisingly quiet workspace. Foam alone won’t block sound—think in terms of barriers, decoupling, and ventilation.
Ever tried to record vocals in a closet only to be bombarded by echoes and the hum of your PC? The truth is, the most effective way to quiet a noisy rig isn’t stacking more foam — it’s keeping it far away from your ears. A rig in another room, or even in a closet with proper ventilation, can be whisper-quiet while still doing the heavy lifting.
This guide reveals how to turn a noisy, heat-generating machine into a silent partner in your creative workflow. It’s about smart placement, layered treatments, and understanding what actually works. Because, in many cases, the best soundproofing is simply putting distance between you and the source.
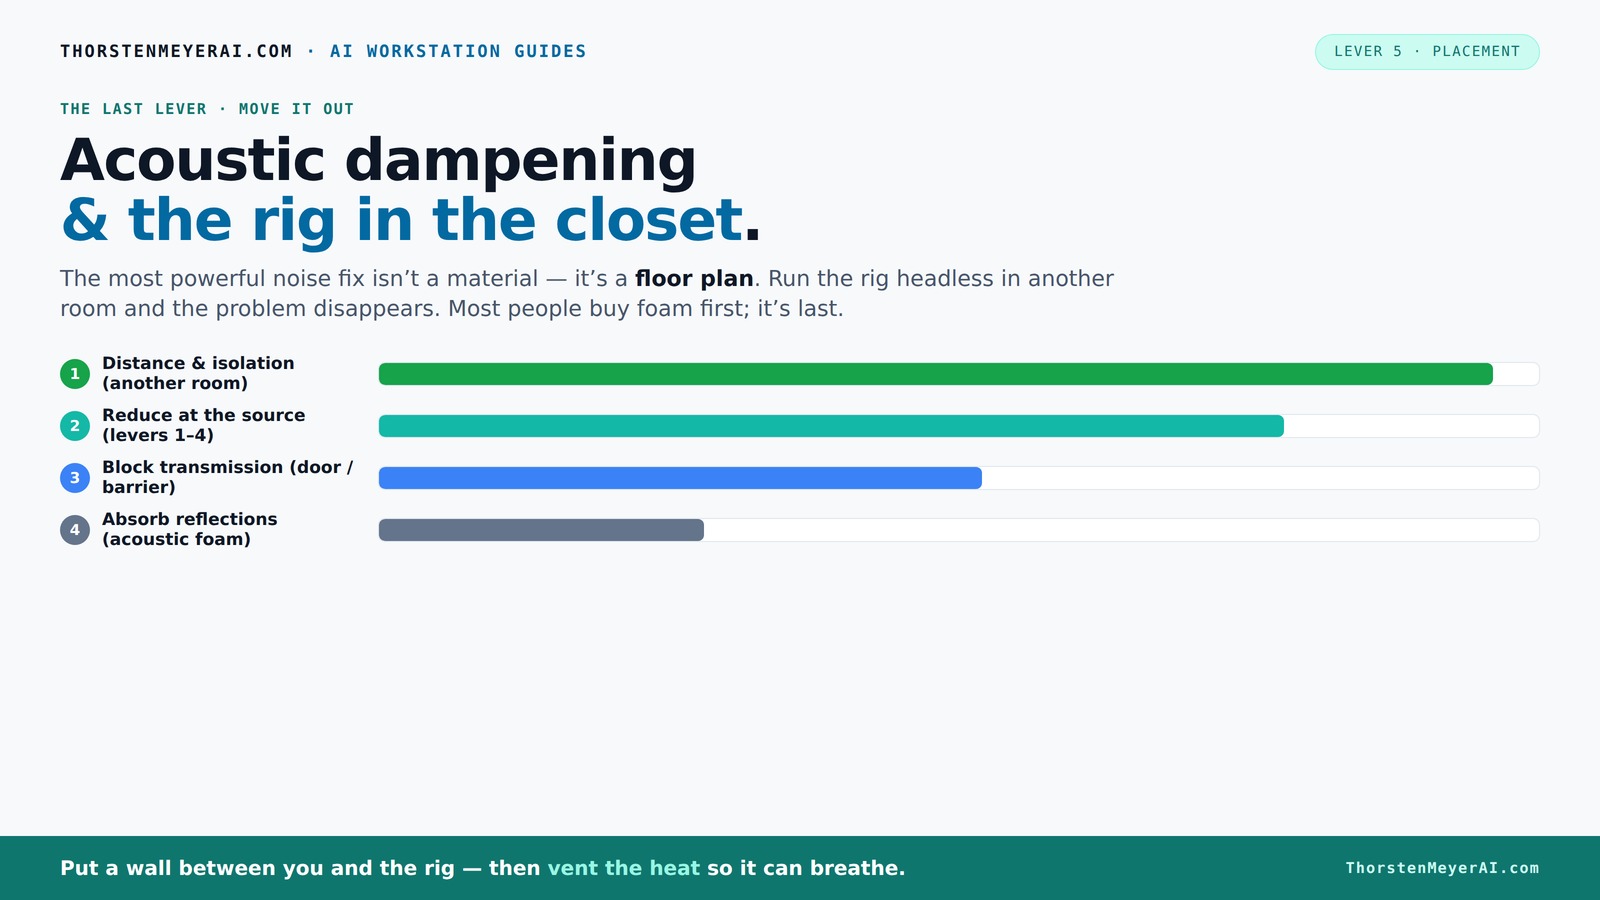
Acoustic dampening
& the rig in the closet.
The most powerful noise fix isn’t a material — it’s a floor plan. A rig you can’t hear because it’s in another room beats any amount of foam. Tap the approaches in Part 1 to see what actually works.
(another room)
(levers 1–4)
(door / barrier)
(acoustic foam)
Contain the noise, not the heat
Key Takeaways
- Moving your noisy rig into a different room or closet is the most effective way to reduce sound without extra treatment.
- Layered treatments—wall panels, bass traps, and sealing gaps—make tiny spaces much quieter and cleaner for recording.
- Proper ventilation is critical; sealed closets trap heat, risking hardware damage and throttling.
- Focus on reflection points first: behind the mic, ceiling, and side walls—then seal gaps around doors and vents.
- Foam absorbs echoes but doesn't block sound leaks; sealing leaks and adding barriers are more effective for soundproofing.

Focusound 52 Pack Acoustic Foam Panels 1" x 12" x 12" Sound Proof Foam Panles Soundproofing Noise Cancelling Wedge Panels for Home Office Recoding Studio with 300PCS Double-Side Adhesive
Soundproofing - Acoustic foam panels triangular grooves structure for better noise absorption, helps to reduce and absorb unwanted...
As an affiliate, we earn on qualifying purchases.
As an affiliate, we earn on qualifying purchases.
Why Moving the Rig Is the Single Best Fix for Noise
Moving your AI workstation into another room or closet is the most straightforward way to silence it. When you’re networked into the rig, your physical proximity doesn't matter. You can SSH or API into it from your desk, while it roars away in a distant closet or basement.
Imagine your GPU tower, humming at 75 dB under load — in the next room, it’s silent. That’s because sound dissipates with distance and barriers. It’s a simple, effective fix that makes all other treatments secondary.
Plus, this setup reduces heat concerns. Your rig can run at full throttle without overheating, provided you give it proper ventilation. This approach often beats buying expensive soundproof cases or foam panels that only absorb echoes within a room.

TroyStudio Portable Vocal Booth, Large Foldable Microphone Isolation Shield, Music Recording Studio Sound Echo Absorbing Box, Desk & Stand Use Reflection Filter with Thickened Dense Acoustic Foam
【BASIC INFO】: Inside size after setup: 8'' (L) X 10'' (W) X 12'' (H), large space for various...
As an affiliate, we earn on qualifying purchases.
As an affiliate, we earn on qualifying purchases.
How the 'Rig in the Closet' Setup Works — and Its Big Caveat
Placing a high-power, heat-generating machine in a closet is an excellent way to muffle noise. It’s like building a little soundproof bunker — but with a catch. Without proper airflow, heat will build up, causing your rig to throttle and fans to spin faster, defeating the purpose.
In real-world terms, a GPU running at 600W can turn a closet into a mini sauna. Without ventilation, temperatures can rise by 20°C or more within an hour, pushing your hardware into danger zone.
The trick is to include active ventilation—either a quiet exhaust fan or ducted airflow—so heat escapes. You can even use a temperature-controlled vent that kicks on only when needed. Proper setup means a rig that’s both quiet and cool, with no risk of overheating.
For more on building a quiet, cool closet rig, check out this detailed guide on reducing heat and noise in a high-power AI workstation.
acoustic treatment for closet workspace
As an affiliate, we earn on qualifying purchases.
As an affiliate, we earn on qualifying purchases.
Layered Acoustic Treatment: The Secret to a Quiet Closet Booth
Acoustic dampening isn’t about foam alone. It’s layering soft, porous materials to soften reflections and echoes while sealing leaks to block sound transmission. Think of your closet as a tiny studio — every hard surface reflects sound, creating a boxy, echoey mess.
Start with the basics: line the walls with thick, porous materials like moving blankets or acoustic panels. Focus on the main reflection points: behind the mic, the ceiling, and the wall behind you. For low frequencies, add bass traps in the corners; these are thicker panels that absorb rumble and standing waves. To learn more about effective acoustic treatment, see this guide on acoustic dampening and placement.
Floor treatment matters, too. A rug or carpet reduces bounce and absorbs sound. Seal gaps around the door with weatherstripping or acoustic sealant—leaks are the biggest culprits for sound escaping.
Layering these treatments transforms a hard, echoing closet into a controlled environment. It’s about controlling reflections and leaks, not just stuffing foam everywhere.
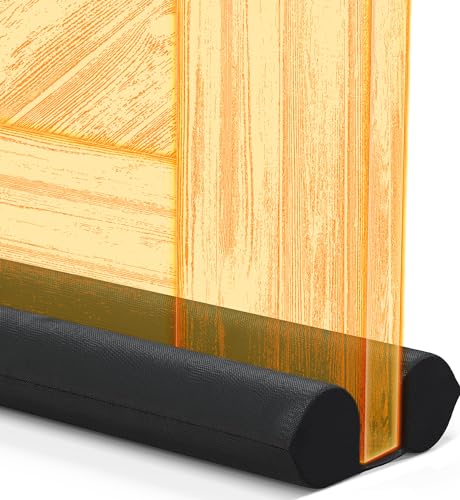
Everlasting Comfort 2 Sided Door Draft Stopper for Bottom of Door - Keeps Cold Air in & Heat Out, 100% Sound Proofing Strip Gap Filler, Quick Install Noise Blocker Sweep for Home - Fits 30"- 36" W
QUICK AND EASY INSTALL: Ideal for doors 30" to 36" wide. Install in a few easy steps -...
As an affiliate, we earn on qualifying purchases.
As an affiliate, we earn on qualifying purchases.
Where to Place Acoustic Panels for Best Results in a Tiny Closet
Placement makes all the difference. The first rule: treat the primary reflection points. When recording, position the mic so that the sound source faces a wall with absorptive material behind it. The wall behind the mic should be the first line of defense against echo.
Next, add panels to the side walls and ceiling, especially if your closet is narrow or boxy. The goal is to break up sound waves bouncing around, reducing that hollow, 'boxy' sound. For low-end control, put bass traps in the corners where low frequencies tend to build up.
If your closet door is hard and reflective, add a thick blanket or acoustic panel over it. Seal any gaps around the door frame with weatherstripping. Every leak lets sound escape, defeating your efforts.
In practice, many creators place a reflection filter or foam panel directly behind the mic, creating a dead zone where sound is clean and dry. The key is to think in three dimensions: front, sides, and ceiling.
How to Seal Your Closet Door & Gaps to Block Sound Leaks
Sound leaks happen through gaps, cracks, and poorly sealed doors. Sealing these leaks is often more effective than adding extra foam. The first step: check all gaps around the door frame, hinges, and any vents. For detailed tips on sealing your closet door and gaps, visit this comprehensive guide on acoustic sealing.
Use weatherstripping tape around the door edges for a tight seal. For larger gaps, apply acoustic sealant, which remains flexible and prevents sound from passing through.
Adding a heavy curtain or moving blanket over the door can also help, especially if sealing isn’t enough. For maximum effect, combine these with door sweeps at the bottom to block sound from slipping underneath.
In real-world scenarios, sealing a closet door reduces sound leaks by up to 80%—making your space dramatically quieter. Remember, even tiny gaps can let in a lot of sound, so don’t skip this step.
Floor & Ceiling Treatments for Better Sound Control
Hard floors reflect sound, bouncing echoes that make a tiny room feel even more hollow. Adding a rug or thick carpet absorbs these reflections and improves overall sound quality. Similarly, the ceiling can act like a drum if left untreated.
If your ceiling is hard and reflective, consider installing a suspended acoustic tile or hanging a foam panel. For a quick fix, hanging a thick blanket can dampen upper reflections and reduce echo.
In a closet, every surface counts. Covering the floor with a dense rug and treating the ceiling with foam or tiles can turn a boxy echo chamber into a controlled environment.
These layers of absorption help tame muddiness and make your recordings clearer, especially when combined with wall treatments and sealing.
Do You Need Bass Traps in a Closet? When Low Frequencies Become a Problem
Bass traps are thick panels designed to absorb low-frequency rumble and standing waves. In small closets, low-end buildup can cause muddy recordings and uneven sound. If you notice a boomy, hollow resonance, bass traps can make a real difference.
Place them in corners where low frequencies tend to concentrate. For tiny spaces, thicker panels—at least 4 inches—are better at absorbing bass than thin foam. You might also consider adding a small bass trap in the door corner or on the wall behind the mic.
In practice, many creators find that bass trapping reduces muddiness, especially in tight closets that lack natural diffusion. Think of it as giving your sound a chance to breathe, with clearer, more balanced recordings.
For detailed options, see this guide on adding bass traps in small rooms.
Common DIY Mistakes to Avoid When Soundproofing a Closet
Many DIYers think foam alone will turn their closet into a soundproof studio. The truth? Foam absorbs echo but does little to block sound leaks. Also, skipping sealing gaps around doors and vents undermines all your efforts.
Another mistake: over-treating with panels, which can create dead zones and make the sound worse. Instead, focus on strategic placement—treat reflection points first, then seal leaks.
Finally, ignoring ventilation leads to overheating and potential hardware damage. Always plan for airflow—use quiet fans or ducted vents to keep your rig cool.
Remember: layered, targeted solutions beat random panel placement. And sealing leaks is just as important as adding panels.
Frequently Asked Questions
Can I really use a closet as a vocal booth?
Absolutely. With proper treatment—treating reflection points, sealing gaps, and adding bass traps—a closet can produce clean, dry recordings. Just remember to manage heat and ventilation to prevent overheating.
What’s more important: soundproofing or acoustic dampening?
Soundproofing blocks sound from escaping or entering, while acoustic dampening reduces echoes and reflections inside a space. For a closet, sealing gaps and barriers is key for soundproofing, while layered treatment improves sound clarity.
Where should I place acoustic panels in a small closet?
Focus on the reflection points: behind the mic, the ceiling, and side walls. Placing panels strategically at these spots minimizes echo and improves recording quality.
Do I need bass traps in a tiny closet?
If you notice low-end muddiness or standing waves, adding bass traps in the corners can improve clarity. Thicker panels (4 inches or more) are best suited for low-frequency absorption in small spaces.
How do I stop sound from leaking through gaps?
Seal gaps around the door frame with weatherstripping, add acoustic sealant to cracks, and consider hanging a heavy blanket or door cover. These simple steps dramatically cut sound leaks.
Conclusion
Silencing your rig isn’t just about stuffing foam panels everywhere. It’s about smart placement, layered treatments, and sealing every gap. When you move the noise away or block its escape, your workspace becomes peaceful — no matter how loud the machine runs.
Remember, a well-ventilated closet with proper sealing and targeted absorption can turn a tiny, echoey space into a professional-sounding studio. The biggest win? You don’t have to drown out the noise — just move it out of your earshot.