
Changing the battery in your AirTag can be a simple process when broken down into seven easy steps.
Beginning with the initial preparation and ensuring compatibility, the subsequent stages guide you through the seamless transition to a new battery.
However, the key lies not only in the physical replacement but in the meticulous attention to detail during reassembly.
The final steps hold the secret to a successful battery swap, making this guide essential for AirTag owners seeking to maintain peak performance.
Key Takeaways
- Gather tools and replacement battery, create workspace, refer to manual.
- Access battery compartment by rotating cover, remove old battery carefully.
- Monitor battery status in 'Find My' app, test AirTag post-replacement.
- Verify AirTag functionality, troubleshoot issues, monitor for further needs.

Duracell CR2032 Lithium Battery 3 Volt, 9 Count, Child Safety Features, Compatible with AirTag, Key Fob, Tea Light Candles and Other Devices, 10 Year Storage Guarantee
LONG-LASTING BATTERIES DESIGNED FOR DEPENDABILITY: Duracell Lithium Coin CR2032 3 Volt batteries deliver long-lasting power and performance you…
As an affiliate, we earn on qualifying purchases.
As an affiliate, we earn on qualifying purchases.
Gather Necessary Tools
To successfully replace the battery of your AirTag, the first step is to gather the necessary tools, including a small screwdriver or a similar tool for removing the battery cover. It is essential to ensure that the screwdriver fits the screws securely to avoid damage during the removal process. Additionally, having a replacement battery that is compatible with your specific AirTag model is crucial for a successful battery replacement.
Creating a clean and well-lit workspace is paramount as it provides a comfortable environment for replacing the battery and reduces the chances of losing any small components during the process. Consider using gloves to protect your hands from any potential contact with the battery, as some batteries may contain substances that could be harmful upon contact.
Lastly, keeping the AirTag manual or online guide nearby for reference is highly recommended. These resources can provide step-by-step instructions tailored to your AirTag model, ensuring a smooth and efficient battery replacement process.

11PCS Mini Precision Screwdriver Set, Small Screwdriver Set for Electronics, Toys, Computer, Watch Repair
【11 DIFFERENT SIZES / STYLES】 – Includes 00-Point 、0-Point 、 1-Point Phillips and Flat head 1.0mm,1.2mm,1.4mm, 1.8mm, 2.4mm,…
As an affiliate, we earn on qualifying purchases.
As an affiliate, we earn on qualifying purchases.
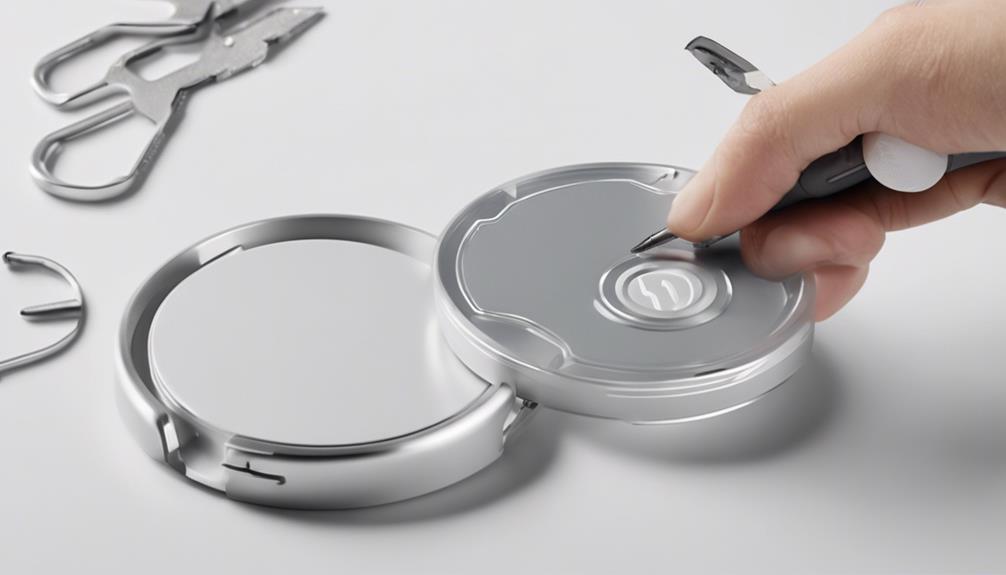
Locate Battery Compartment

The first step in replacing your AirTag battery is to locate the battery compartment.
This compartment is situated beneath the polished stainless steel cover of the AirTag.
To access the compartment, simply press down and rotate the cover counterclockwise to easily reveal the battery compartment.
Find Battery Cover
Located on the back of the AirTag device is the battery cover, providing access to the battery compartment. This cover is designed to be rotated and removed to access the battery. It features three tabs that align with corresponding slots on the AirTag, ensuring easy reattachment after battery replacement.
When handling the battery cover, it is crucial to do so with care to prevent any damage during the removal and replacement process. Proper alignment and secure attachment of the battery cover are essential steps to guarantee the AirTag functions correctly post-battery replacement.
Open Compartment Carefully
Gently press down and rotate the stainless steel cover counterclockwise to access the battery compartment on your AirTag device.
The battery compartment, located on the back underneath the cover, is designed for secure battery placement while facilitating easy replacement.
It is crucial to exercise caution when opening the compartment to prevent any damage to the cover or the AirTag itself. By handling the compartment carefully, you ensure a smooth and successful battery replacement process.
This step sets the foundation for the subsequent battery replacement tasks and ensures that you can proceed with ease and precision.
Proper handling of the compartment is key to maintaining the functionality and integrity of your AirTag.
Remove Old Battery
To proceed with removing the old battery from your AirTag, carefully open the battery compartment by pressing down and rotating the polished stainless steel cover counterclockwise. The battery compartment, situated beneath this cover, is where the battery is housed. Once the cover is rotated and pops up, you will have access to the old battery.
It is crucial to safely dispose of the old battery in accordance with local regulations. Prior to inserting a new battery, inspect the battery compartment for any debris or damage that may impede the proper functioning of the AirTag. By following these steps meticulously, you can ensure a smooth transition when replacing the battery in your AirTag.
Duracell CR2032 Lithium Battery 3 Volt, 9 Count, Child Safety Features, Compatible with AirTag, Key Fob, Tea Light Candles and Other Devices, 10 Year Storage Guarantee
LONG-LASTING BATTERIES DESIGNED FOR DEPENDABILITY: Duracell Lithium Coin CR2032 3 Volt batteries deliver long-lasting power and performance you…
As an affiliate, we earn on qualifying purchases.
As an affiliate, we earn on qualifying purchases.
Remove Old Battery

Carefully press down and twist the battery cover counterclockwise to remove the old battery from your AirTag. Once the cover is rotated, lift your fingers to allow the cover to pop up easily. It's crucial to handle this step with care to avoid any damage to the battery cover during removal. After successfully taking out the old battery, ensure you dispose of it properly following the recommended recycling guidelines. Keep the old battery away from the reach of small children or pets to prevent any accidents.
| Steps to Remove Old Battery | |||
|---|---|---|---|
| 1. Press down on the battery cover | 2. Rotate the cover counterclockwise | 3. Lift your fingers to pop up the cover | 4. Remove the old battery carefully |

TagSaver Replacement Batteries for Apple AirTag, Perfectly Fits AirTag, No Bitter Coating, OEM CR2032 Battery (Pack of 4)
Genuine OEM Batteries: This kit includes four CR2032 batteries sourced from the same manufacturer that supplies Apple, ensuring…
As an affiliate, we earn on qualifying purchases.
As an affiliate, we earn on qualifying purchases.
Insert New Battery

When replacing the battery in your AirTag, ensure that the positive side of the new battery faces towards you during insertion. This step is crucial to prevent any potential damage to the device and ensure it functions properly.
To insert the new battery correctly, follow these steps:
- Use a compatible battery: Make sure to use a battery size that is suitable for the AirTag to guarantee optimal performance and longevity.
- Press firmly: When inserting the new battery, press it firmly into place to establish a secure connection and avoid any issues with power supply.
- Double-check alignment: After inserting the battery, double-check that it is properly aligned and seated within the AirTag to avoid any connectivity problems.
Reassemble AirTag

When reassembling your AirTag, ensure the battery cover's three tabs align with the corresponding slots on the device for a proper fit.
Press down firmly on the cover to establish a secure connection with the new battery and listen for the battery chime to confirm successful reassembly.
Remember to rotate the battery cover clockwise to lock it securely and double-check for a firm attachment to prevent any functionality issues.
Secure Battery Compartment
To ensure proper reattachment of the battery cover on your AirTag, align the three tabs on the cover with the corresponding slots on the device.
Steps to Secure the Battery Compartment:
- Press down firmly on the battery cover to prevent accidental opening.
- Listen for the battery chime sound to confirm secure attachment.
- Rotate the battery cover clockwise for additional security.
Ensuring the tabs align correctly and following these steps will help secure the battery compartment effectively. Remember to double-check that the cover is tightly in place before using your AirTag to prevent any issues.
Test Functionality Post-Assembly
After replacing the battery in your AirTag, it is essential to verify its functionality by conducting a series of tests to ensure proper operation.
Reassemble the AirTag and check if it can be detected by your Apple device. Use the Find My app to confirm that the AirTag emits a sound when located. Ensure the Bluetooth connection remains stable and accurate for tracking.
Test the responsiveness of the AirTag to prompts from the Find My app, such as playing a sound or displaying its location. Assess the battery life and tracking performance to confirm the successful replacement and proper functioning of the device.
Conducting these tests post-assembly will help ensure that your AirTag is working correctly and ready for use.
Test AirTag Functionality
It is essential to routinely test the functionality of your AirTag to ensure its optimal performance. To effectively test your AirTag post-battery replacement, follow these steps:
- Use the 'Find My' app on your iPhone to locate the AirTag. This will confirm that the connection between the AirTag and your device is working correctly.
- Check the battery status of your AirTag within the 'Find My' app to ensure it is accurately reporting the power level. This step helps in monitoring the battery health of your AirTag.
- Prompt the AirTag to emit a sound through the app. The audible sound indicates that the AirTag is functioning correctly after the battery replacement, providing both a visual and auditory confirmation of its operational status.
Reset AirTag If Needed

Testing the functionality of your AirTag post-battery replacement is crucial; however, if troubleshooting issues arise, resetting the AirTag can be a beneficial step. To reset your AirTag, press and hold the white side button until you hear a sound. After resetting, re-pair your AirTag with your device to resume tracking functionalities. Resetting the AirTag can help troubleshoot issues related to battery replacement. Make sure to reset the AirTag only if necessary to avoid unnecessary disruptions. Following a reset, check the battery status to ensure proper functionality.
| Steps to Reset AirTag |
|---|
| Press and hold the white side button |
| Wait for the sound indication |
| Re-pair with your device |
Frequently Asked Questions
How Do I Replace the Battery in My Airtag?
To replace the battery in your AirTag, rotate the polished stainless steel battery cover counterclockwise and position the new battery with the positive side facing you. Align the tabs on the cover with the slots on the AirTag, secure it, and confirm successful installation with the battery chime.
How Do I Reset My Airtag With a New Battery?
To reset your AirTag with a new battery, remove the cover and old battery, insert a new compatible battery with the positive side facing you, securely reattach the cover, listen for the chime, then rotate the cover to lock it.
How Do I Pair My Airtag Again?
To pair your AirTag again, bring it near your iOS 14.5 or later device. Follow on-screen instructions to re-pair it with your Apple ID. Ensure the AirTag is adequately charged or has a new battery. Use the Find My app for additional assistance if needed.
Why Isn T My Airtag Working After Battery Change?
Ensure correct battery orientation and compatibility. Securely attach cover. Listen for chime sound after replacement. If AirTag still not working, verify correct battery placement and cover attachment. Follow precise steps to guarantee successful battery change.
Conclusion
In conclusion, replacing the battery in your AirTag is a simple process that can be completed in 7 easy steps. Just like changing a battery in a device, ensuring a smooth transition is key to maintaining functionality.
By following these steps carefully, you can keep your AirTag working efficiently and effectively. Just as a well-oiled machine requires proper maintenance, your AirTag will benefit from a quick battery replacement to keep it running smoothly.